
We have been having so much fun making crossbows, trebuchets, catapults, costumes and castles (whew) for our Kings and Queens unit study that this almost scratched this project off of our list. Thankfully, icy roads and freezing temperatures, had us locked up in the house so we were able to make this pretty faux glass window. It is nice balance to all of the weapons we have been making!
You need:
Some sort of picture with simple lines
Card stock
Old crayons
Wax paper
Grater (I wish I had used a crank cheese grater)
Iron (sad to say, it took me 30 minutes to FIND my iron. I don't think I have used it since I had kids!)
First draw your shape onto card stock. (I wish I would have then made a copy of the pattern to that it would be easier to piece together later) Then cut the pieces apart to make a template for each section of the window.

Next, get to peelin' and gratin' those crayons. That was really the most time consuming part of the project. Luckily, I have two willing assistants.
 Dump the crayon shavings onto a piece of wax paper.
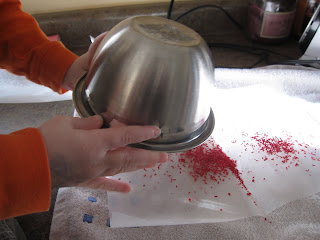
Fold the paper in half and iron until the wax melts. All the directions I have seen say to use a low setting. I cranked it up as I as a I could. What can I say, patience is not my best quality when it comes to crafts.  Isn't that pretty?
 Finally, copy the template onto your wax paper and then cut out your pieces of "stained glass." The prettiest way to finish this project is to glue small strips of black paper to secure the pieces to one another. We just used some good old fashioned scotch tape!
For more We Made It Friday, check out Ramblings of a Crazy Women.
 Isn't that pretty? Finally, copy the template onto your wax paper and then cut out your pieces of "stained glass." The prettiest way to finish this project is to glue small strips of black paper to secure the pieces to one another. We just used some good old fashioned scotch tape!
For more We Made It Friday, check out Ramblings of a Crazy Women.
That is very cool! I hadn't thought of doing it this way before.
ReplyDeletegreat idea! Very nice! :)
ReplyDeletethat turned out great! wonderful idea thanks for sharing!!!
ReplyDeleteWow!!!! That is a great dragon.
ReplyDelete