Showing posts with label Homeschool. Show all posts

Thursday, August 4, 2011

Want a Project that Will Keep the Kids Busy for Hours? Giant Paper Mache Dragons!

IMG_2284

Isn’t he cute?

We recently moved to an old Victorian house that our kids nicknamed the “castle”.  (Psst.  Don’t tell them it isn’t a real castle, the WILL argue with you.)  Dylan decided we should make an enormous dragon so that its head was sticking out of the top story and into the house and his tail was wrapped around the outside.  While I think that is a fabulous idea, my husband didn’t agree and so we came up with Fred. 

The idea was inspired by Gourmet Paper Mache’s incredible paper mache art.  This guy is AMAZING, a true artist.  The boys have watched all of his videos countless times.

Creating the dragon was easy and almost 100% kid made.  I did interfere once and poor Fred now has six legs because of it!  Guess I should have listened to the 6 year old.  Oops.

Supplies needed:

  • Tomato Cage
  • Plastic grocery bags (or any other materials you wish to recycle
  • Masking tape, LOTS of masking tape
  • Paper for the outside.  We reused the craft paper from our move, but paper grocery bags or “craft” paper would work just as well.
  • Elmer’s Paper Mache Paste.  I don’t mess with that flour/water stuff….too messy for me.

Step 1:  Flip the tomato cage upside down.IMG_1390

Step 2:  Fill plastic bags with paper (or other plastic bags) and tape them together to form the bulk of the body.  It doesn’t need to be perfect at this point.  Just get it on there.

IMG_1392

Step 3: Add paper and tape and then MORE paper and tape and even MORE paper and tape until you start to create a shape you like.  Honestly, I cannot tell you how hard it was for me to stay our of the way and let the kids have at it.  I just kept taking biting my tongue and drinking Chai Tea and it turned out fabulous…even without my “help.”  Dylan is my little perfectionist and kept putting on more layers until he thought it was just  right.

155685_1737608480966_1261251269_31998712_5534422_n155817_1745821446285_1261251269_32017016_7665581_n

155979_1745822726317_1261251269_32017025_7225955_n163092_1745822206304_1261251269_32017021_7597506_n

Step 4:   Paper Mache.  We use Elmer’s Paper Mache Paste for all of our paper mache.  I just can’t deal with the goopy, powdery mess flour makes.  Elmer’s Paper Mache Paste is cheap, can be stored for future use and is WAY cleaner.

163010_1750651287028_1261251269_32025847_7588916_n162832_1750650767015_1261251269_32025844_5810640_n156787_1750651567035_1261251269_32025849_4101829_n

Step 5: Paint.  Acrylics (yes, the paints that stain clothes) are the best.  Otherwise, you’ll need to cover your finished creation with Modge Podge.

68119_1761723963838_1261251269_32048767_8149352_n162672_1770680347742_1261251269_32069320_7011046_n148208_1770680787753_1261251269_32069321_252107_n

Have Fun!  We are already starting to plan our next project!

Sunday, January 3, 2010

"Stained Glass" Window with Crayons


We have been having so much fun making crossbows, trebuchets, catapults, costumes and castles (whew) for our Kings and Queens unit study that this almost scratched this project off of our list. Thankfully, icy roads and freezing temperatures, had us locked up in the house so we were able to make this pretty faux glass window. It is nice balance to all of the weapons we have been making!


You need:

Some sort of picture with simple lines

Card stock

Old crayons

Wax paper

Grater (I wish I had used a crank cheese grater)

Iron (sad to say, it took me 30 minutes to FIND my iron. I don't think I have used it since I had kids!)


First draw your shape onto card stock. (I wish I would have then made a copy of the pattern to that it would be easier to piece together later) Then cut the pieces apart to make a template for each section of the window.


Next, get to peelin' and gratin' those crayons. That was really the most time consuming part of the project. Luckily, I have two willing assistants.

Dump the crayon shavings onto a piece of wax paper.

Fold the paper in half and iron until the wax melts. All the directions I have seen say to use a low setting. I cranked it up as I as a I could. What can I say, patience is not my best quality when it comes to crafts. Isn't that pretty?

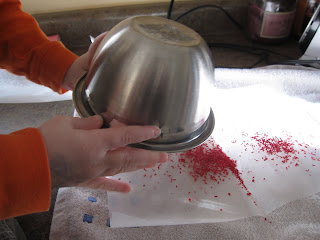
Finally, copy the template onto your wax paper and then cut out your pieces of "stained glass." The prettiest way to finish this project is to glue small strips of black paper to secure the pieces to one another. We just used some good old fashioned scotch tape!

For more We Made It Friday, check out Ramblings of a Crazy Women.

Thursday, October 8, 2009

Weekly Wrap-Up: Corn is a Fruit, and Other Happenings

This week started out with a bang and fizzled....FAST. I am in the midst of the first trimester, can't ever remember being this tired in my life phase with the added bonus of children who do not nap.
Family Field Day to officially kick off our study of Nutrition, Exercise, Rest and Fun.
Thank goodness we had science class at my house this week and it was on Nutrition, which is what we are studying. Awesome!
Oh and it has been confirmed by a botanist, botanically speaking CORN is a FRUIT. Go figure. It can also be considered a grain. Technically vegetables do not have seeds and corn is a bunch of seeds.
We did some apple prints....that is the extent of my creativity these days.


Logan gave himself a black eye.
Taste testing some apples.


Yup, and this is the extent of our "academic" learning this week.
Painting from an areal perspective. That was Dylan's idea and a great one at that.


These paints are incredible! The colors are so vibrant!

Dylan started making this "Nutrition" game, I am excited to see how it turns out.

For more Weekly Wrap-ups check out Kris at Weird, Unsocialized Homeschoolers

Monday, October 5, 2009

Konos Attentiveness

We finished up our Konos Unit on Attentiveness last week. We learned a lot and made many wonderful memories!
We constructed some wind chimes
and a scale with water and glasses


Vibrations make things move!


Signs for our bikes

Bigger Ears = Louder Sound

Frogs have funny ears.


Wow, that is loud!

It works on the cello too!

...and the box


Our voices are powerful!

Field Trip to the Illinois Railway Museum.


Stop, Look and Listen


And of course, our crawl through ear


Sunday, October 4, 2009

Family Field Day

We kicked off our Stewardship Konos unit with a Family Field Day!